Showing posts with label shantyboat. Show all posts
On the Eve of the Secret History of American River People Expedition
As you may have heard, the shantyboat nears completion and we are readying it for the Secret History of American River People expedition on the Upper Mississippi starting in a few days.
This is a research journey to gather and present the lost stories of people living on or adjacent to the river. You can read all about it at the project website.
You can follow our progress on our voyage. You may want to hear about our triumphs and travails and the cool people we meet. If so, you can get automatic updates via email (or Twitter or Instagram and so on) right here: http://peoplesriverhistory.us/contact/
I also hope you will keep in touch with us and send us contacts of amazing people we want to talk to on the Upper Mississippi.
Thanks for all your support that has made this project possible.
Labels:
boat building
,
boatbuilding
,
shantyboat
Shantyboat on the Mississippi
In July, we are bringing the shantyboat across country to launch in the Mississippi River on an art and history expedition:
A journey to rediscover the lost narratives of river people, river communities, and the river itself.
Secret History is an anthro-historical artist's journey through the history of a river. It weaves together threads of adventure, history, art, and story.
We take to the river, Those forgotten waterways that flow through most towns, hidden behind levees, shoved underground or behind the seediest neighborhood.
Just a few generations ago, there were whole communities of people living right on the river in shantyboats. And people living in the bottomlands that flood every spring. Now mostly all gone.
We are fundraising right now to help make the project happen. There is also a beautiful video we produced to give you a lyrical flavor of the project.
The Kickstarter campaign is critical for launching the Secret History expedition. It will help pay for final outfitting of the shantyboat and transporting it across country. It will make sure we have decent audio-video equipment to record our interviews in the river communities we visit.
Thanks for helping support the project.
![]() |
| Thanks to espressobuzz for the historic photo |
Secret History is an anthro-historical artist's journey through the history of a river. It weaves together threads of adventure, history, art, and story.
We take to the river, Those forgotten waterways that flow through most towns, hidden behind levees, shoved underground or behind the seediest neighborhood.
Just a few generations ago, there were whole communities of people living right on the river in shantyboats. And people living in the bottomlands that flood every spring. Now mostly all gone.
We are fundraising right now to help make the project happen. There is also a beautiful video we produced to give you a lyrical flavor of the project.
The Kickstarter campaign is critical for launching the Secret History expedition. It will help pay for final outfitting of the shantyboat and transporting it across country. It will make sure we have decent audio-video equipment to record our interviews in the river communities we visit.
Thanks for helping support the project.
Labels:
boat building
,
boatbuilding
,
shantyboat
What the #*@&% happened?
You must hate me.
Last I left you with "Walls take shape" and then radio silence for six months. Did I lose interest in the project? Get tragically killed by a falling jet engine?
No, I'm not dead and the project is moving along albeit a little more slowly. I started grad school. Which means that I no longer have the time for such luxuries as eating and sleeping. However, I still spent many weekends working on the boat.
So the blog is six months behind, but the shantyboat is six months further along. Things in store for you as I update the blog, walls, windows, roof, decks, steps, doors. Cool things like that.
So feel free to send me an email urging me along with blog posts. Here's my commitment: For every email, I receive from a different blog reader, I will create a new shantyboat post.
Last I left you with "Walls take shape" and then radio silence for six months. Did I lose interest in the project? Get tragically killed by a falling jet engine?
No, I'm not dead and the project is moving along albeit a little more slowly. I started grad school. Which means that I no longer have the time for such luxuries as eating and sleeping. However, I still spent many weekends working on the boat.
So the blog is six months behind, but the shantyboat is six months further along. Things in store for you as I update the blog, walls, windows, roof, decks, steps, doors. Cool things like that.
So feel free to send me an email urging me along with blog posts. Here's my commitment: For every email, I receive from a different blog reader, I will create a new shantyboat post.
Labels:
apologies
,
boat building
,
boatbuilding
,
committment
,
delays
,
excuses
,
promises
,
shantyboat
Roof Rafters - The cabin takes shape
When we disassembled the Hollister chicken coop, we got a bunch of beautiful old 1x12 redwood siding, a shitton of corrugated metal, a handful of old dimensional redwood 2x4s, and finally, a dozen or so roof rafters, complete with birdsmouths.
True they were old and some were a little worse for wear, rotted at the ends or showing signs of termites, but most were quite usable.
This is an awesome diagram with much of what you need to know about roofs in general. Terms you'll need for our shantyboat roof are common rafter, ridgeboard, birdsmouth, eave, gable end and gable end stud, ladder, collar tie, and rafter tie (also called a ceiling joist).
I sorted the good rafters from the marginal. The usable but marginal ones I treated with CopperGreen Clear and cut off the bad parts.
Since our shantyboat is smaller than the original chicken coop, I cut the rafters down to size, decreasing the overall length as well as the length of the eaves. I carefully cut the angle where they met in the center and re-cut the angle of the birdsmouth.
I laid them out on the floor of the barn, and used a temporary plywood collar tie (leaving a slot at the top for the ridgeboard) to keep everything from going wonky while I struggled to secure them into place.
With some ridiculously awkward effort, I got the two end rafters up supporting the ridgeboard.
Then one by one, I installed each of the rafter pairs.
Finally, I added a permanent collar tie to each of the inside rafter. I suppose soon I will have to add a ladder to support the gable overhang and a fly rafter.
At the end of the day, for the first time, I was able to see the shape and size and height of this crazy boat.
True they were old and some were a little worse for wear, rotted at the ends or showing signs of termites, but most were quite usable.
This is an awesome diagram with much of what you need to know about roofs in general. Terms you'll need for our shantyboat roof are common rafter, ridgeboard, birdsmouth, eave, gable end and gable end stud, ladder, collar tie, and rafter tie (also called a ceiling joist).
I sorted the good rafters from the marginal. The usable but marginal ones I treated with CopperGreen Clear and cut off the bad parts.
Since our shantyboat is smaller than the original chicken coop, I cut the rafters down to size, decreasing the overall length as well as the length of the eaves. I carefully cut the angle where they met in the center and re-cut the angle of the birdsmouth.
I laid them out on the floor of the barn, and used a temporary plywood collar tie (leaving a slot at the top for the ridgeboard) to keep everything from going wonky while I struggled to secure them into place.
With some ridiculously awkward effort, I got the two end rafters up supporting the ridgeboard.
Then one by one, I installed each of the rafter pairs.
Finally, I added a permanent collar tie to each of the inside rafter. I suppose soon I will have to add a ladder to support the gable overhang and a fly rafter.
At the end of the day, for the first time, I was able to see the shape and size and height of this crazy boat.
Labels:
birdsmouth
,
boat building
,
boatbuilding
,
building
,
cabin
,
ceiling joist
,
collar tie
,
construction
,
eave
,
framing
,
gable end
,
ladder
,
rafter
,
rafter tie
,
ridgeboard
,
roof
,
shantyboat
,
top plate
,
walls
Cabin Framing, More Mistakes Were Made
If there's one thing I'm good at, it's not being good as things. But given my delightfully blinding optimism, I plunge on ahead anyway, learning a ton with each monumental goof.
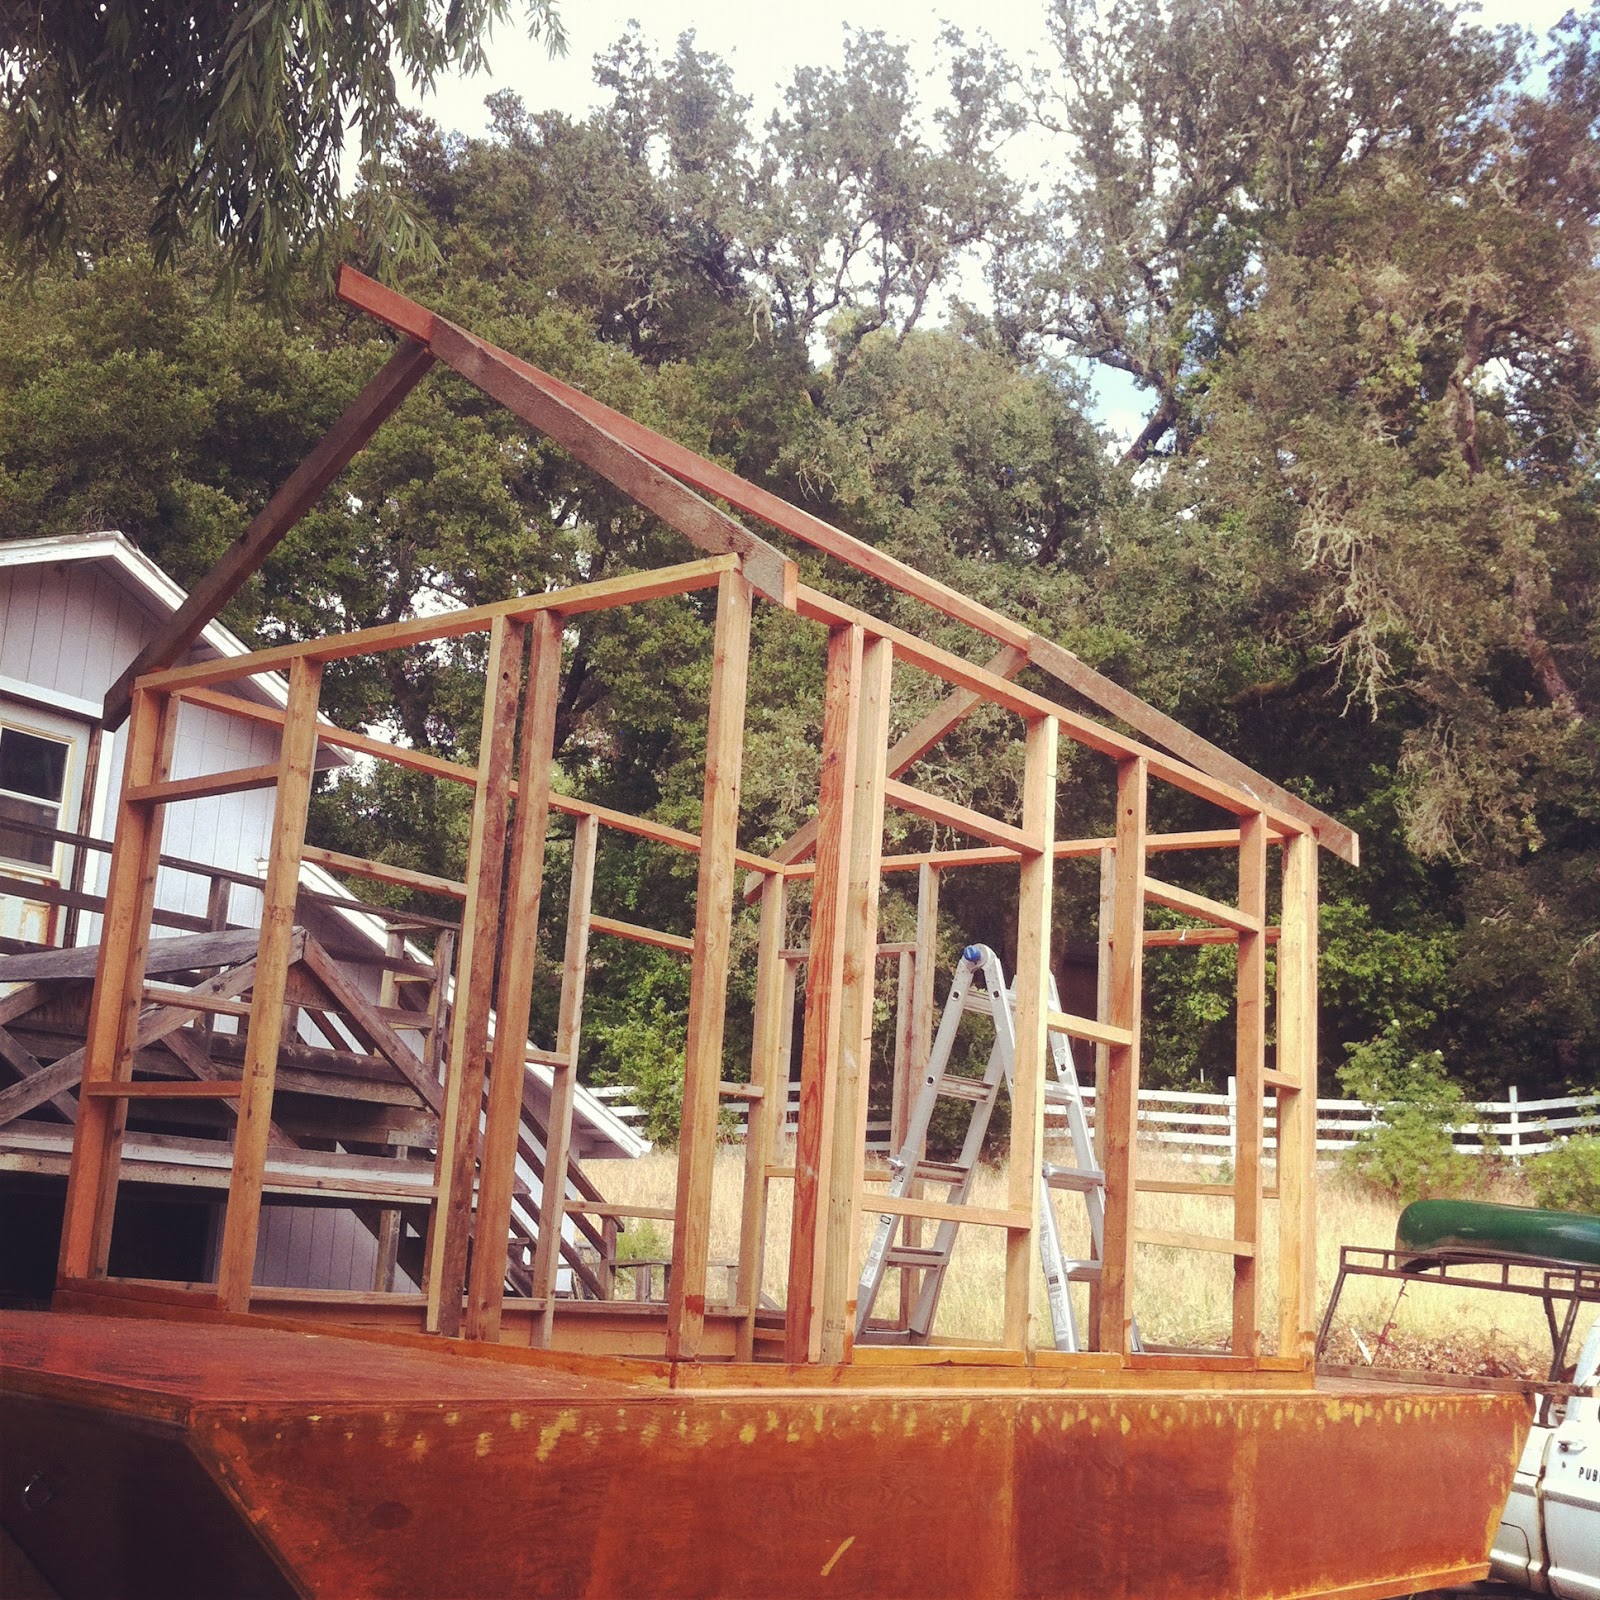
You remember the cabin framing looked like this. That's more or less an eight foot wall, with maybe 1 foot 8 inches below the deck of the hull. The height was chosen more or less arbitrarily, based I think on having 8 foot two-by stock to work with for the framing.
At this point I'm thinking all the great and rare 1x12 redwood we pulled from the decommissioned chicken coop was not going to be enough wood, and was gong to be too brittle, too bug eaten or rotten, and too heavy. So I was pricing new redwood, though this was not my ideal.
When I got down to thinking about (and pricing) the redwood siding, I realized I'd made a small but critical blunder. About 2-1/2 inches of blunder.
Had I made the walls a tiny tiny bit shorter, I could have used 6 foot long boards for the siding. This made a huge difference in the pricing since 1x12 or 1x10 redwood is already expensive, but longer lengths are even more so. With 6 foot lengths, I could easily cut 12' lumber in half, but the next common step up is 16' lengths, which were much more spendy and wasteful.
Well, the cabin already looked ridiculously tall, and I wasn't yet committed to the height, so I decided to do something crazy...
I cut the walls down 2-1/2 inches. I clamped my carpenter's square to each stud to serve as a guide for my skillsaw and cut a few inches off of each stud.
Considering that everything was glued and screwed (or nailed), it wasn't easy. I had to remove the little stud nubs and glue and nail the top plate to the new tops of the studs.
It only took most of a morning to fix the height of the cabin. Now the walls measure exactly six foot from the deck to the top of the walls.
As a consolation for my troubles (and perhaps reward for conscientiously correcting my mistake), I had a beautiful visitor that day.
You remember the cabin framing looked like this. That's more or less an eight foot wall, with maybe 1 foot 8 inches below the deck of the hull. The height was chosen more or less arbitrarily, based I think on having 8 foot two-by stock to work with for the framing.
At this point I'm thinking all the great and rare 1x12 redwood we pulled from the decommissioned chicken coop was not going to be enough wood, and was gong to be too brittle, too bug eaten or rotten, and too heavy. So I was pricing new redwood, though this was not my ideal.
When I got down to thinking about (and pricing) the redwood siding, I realized I'd made a small but critical blunder. About 2-1/2 inches of blunder.
Had I made the walls a tiny tiny bit shorter, I could have used 6 foot long boards for the siding. This made a huge difference in the pricing since 1x12 or 1x10 redwood is already expensive, but longer lengths are even more so. With 6 foot lengths, I could easily cut 12' lumber in half, but the next common step up is 16' lengths, which were much more spendy and wasteful.
Well, the cabin already looked ridiculously tall, and I wasn't yet committed to the height, so I decided to do something crazy...
I cut the walls down 2-1/2 inches. I clamped my carpenter's square to each stud to serve as a guide for my skillsaw and cut a few inches off of each stud.
Considering that everything was glued and screwed (or nailed), it wasn't easy. I had to remove the little stud nubs and glue and nail the top plate to the new tops of the studs.
It only took most of a morning to fix the height of the cabin. Now the walls measure exactly six foot from the deck to the top of the walls.
As a consolation for my troubles (and perhaps reward for conscientiously correcting my mistake), I had a beautiful visitor that day.
Labels:
boat building
,
boatbuilding
,
butterfly
,
carpentry
,
construction
,
errors
,
framing
,
glue
,
mistakes
,
shantyboat
,
studs
,
walls
Bow Eyes and Stern Tiedowns
Sometimes little things can be a big headache. And sometimes big headaches can turn out not to be that big a deal at all. And so it was with the bow eyes and stern tiedowns.
Here's the idea, I have a trailerable shantyboat. It is really really nice if when I am towing down the road if it stays on the trailer. (See Tips on how not to die in a fiery ball of twisted metal on the highway.)
So we add a few hooks into the hull that allow us to attach it to the trailer. Additionally, the boweye will allow us to winch the boat the last few feet onto the trailer, as well as be towed if we ever need to do that.

A boweye and a stern tiedown look pretty much the same -- typically a stainless steel U-bolt that ties into the framing members of the boat. The price of boweyes varied tremendously, and not necessarily commensurate with the quality of the hardware. That was frustrating. After lots of searching online, I found a high quality, reasonably priced set of boweyes/tiedowns.
I was not that excited about drilling more holes in my allegedly waterproof hull. Additionally, since there wasn't space within the tight confines of the boat to drill from the inside, I had to drill a hole from the outside and yet still hit the precise center of a one and a half inch framing member. Ack.
So this required a good deal of measurement, re-measurement, guess-work, and calculation.
Word on the street is that there is a clever device to make sure that the holes you drill are perpendicular to the plane of the surface you are drilling, a kind of portable drill press. I don't have one of those. I used my carpenter's square to ensure that my hole was perpendicular.
Despite all my calculations, you can see my first hole that was vertically positioned too high. Inside, the hole was positioned on the framing member without enough space to receive a nut. Laterally though, my holes were perfect positioned.
I considered epoxying the inside of the holes to prevent damage if water should get inside, but only primed the holes instead.
I used the special silicone adhesive and sealant (referred to around here as the Black Goo) on the portion that would rest against the hull before tightening the boweye. .
Inside the bulkhead under the desk, I tightened down the boweye.
Cleaning up the sealant, I had a beautiful boweye mounted to the center of the bow. Rinse, repeat, and I had the stern tiedowns bolted into the members beneath the stern.
It wasn't as hard as I'd feared, nor as easy as I hoped. Awesome.
Here's the idea, I have a trailerable shantyboat. It is really really nice if when I am towing down the road if it stays on the trailer. (See Tips on how not to die in a fiery ball of twisted metal on the highway.)
So we add a few hooks into the hull that allow us to attach it to the trailer. Additionally, the boweye will allow us to winch the boat the last few feet onto the trailer, as well as be towed if we ever need to do that.

A boweye and a stern tiedown look pretty much the same -- typically a stainless steel U-bolt that ties into the framing members of the boat. The price of boweyes varied tremendously, and not necessarily commensurate with the quality of the hardware. That was frustrating. After lots of searching online, I found a high quality, reasonably priced set of boweyes/tiedowns.
I was not that excited about drilling more holes in my allegedly waterproof hull. Additionally, since there wasn't space within the tight confines of the boat to drill from the inside, I had to drill a hole from the outside and yet still hit the precise center of a one and a half inch framing member. Ack.
So this required a good deal of measurement, re-measurement, guess-work, and calculation.
Word on the street is that there is a clever device to make sure that the holes you drill are perpendicular to the plane of the surface you are drilling, a kind of portable drill press. I don't have one of those. I used my carpenter's square to ensure that my hole was perpendicular.
Despite all my calculations, you can see my first hole that was vertically positioned too high. Inside, the hole was positioned on the framing member without enough space to receive a nut. Laterally though, my holes were perfect positioned.
I considered epoxying the inside of the holes to prevent damage if water should get inside, but only primed the holes instead.
I used the special silicone adhesive and sealant (referred to around here as the Black Goo) on the portion that would rest against the hull before tightening the boweye. .
Inside the bulkhead under the desk, I tightened down the boweye.
Cleaning up the sealant, I had a beautiful boweye mounted to the center of the bow. Rinse, repeat, and I had the stern tiedowns bolted into the members beneath the stern.
Labels:
boat building
,
boatbuilding
,
boweye
,
construction
,
errors
,
shantyboat
,
tie-downs
The Cabin Has a Floor
Let's put in a floor! This is the floor that will be inside the cabin.
Remember the beautiful old redwood I got from the chicken shed that Jen, Kai, Alex and I salvaged last year? I wanted to use these thick 1x12s for flooring in the boat. The also have the advantage of putting some weight down into the hull of the boat.
I had a worry that using straight boards for floorboards, there would be little cracks between them that would constantly filter dust into the bilge and possible squeak when you walked on them. So I had the idea to route the edges to make them lap each other.
Ten boards, eight foot long, two edges each. That's a lot of routing.
Actually, none of the boards were eight foot long, so they had to go in piece by piece.
I used construction adhesive and exterior nails to secure the flooring down. The adhesive will keep the flooring from squeaking and slowly coming up. Modern construction adhesive is so strong, that when you take up plywood that has been adhered down, it comes up in pieces.
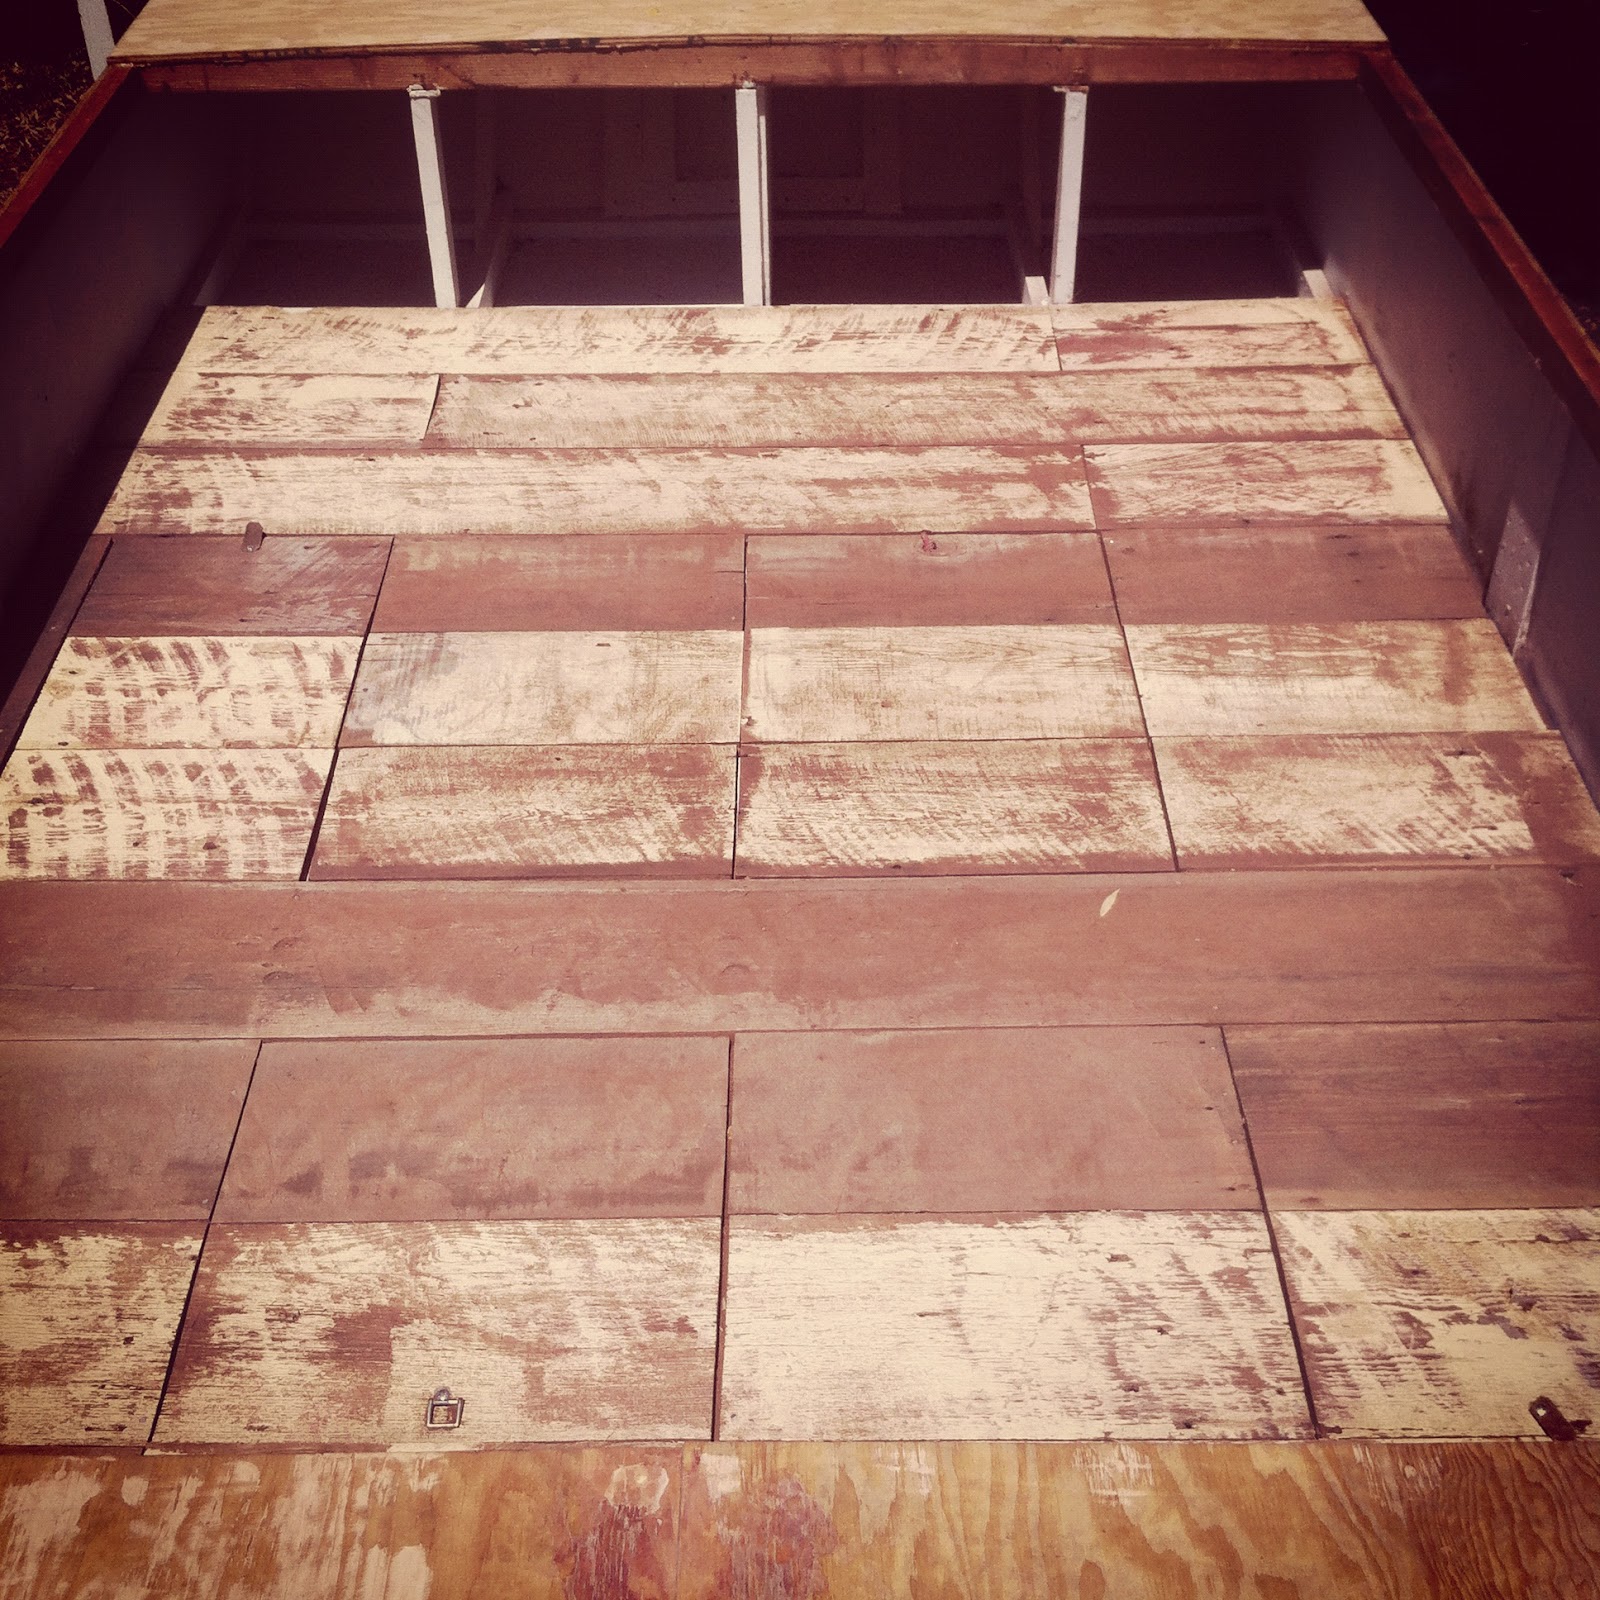
It ended up having a neat look.
I wanted to put hatches wherever I could under spaces that were not occupied by fixed objects such as the head, the galley, and the woodstove. After the first three boards aft, I had to start getting strategic with my flooring installation.
It slowly came together. I tried to make the hatch covers match the surrounding boards best I could.
Here's a really bad idea: Using wood that has been nibbled by termites. Some of the wood when I routed it, not only revealed whole termite empires, but actual live buggies.
I went to the lumber yard and drenched everything in Copper Green. This is a special (and more expensive) clear preservative. By clear they actually mean, kind of a deep amber -- but that's preferable to the bright green of the regular stuff.
After all the flooring and the hatches were in, I attacked it with the belt stander, knocking down edges and leaving the different shades a bit more uniform.
I quite like how it came out. I made mismatched hatch handles for each of the four hatches. Can you spot all four?
Here's one of the adorable little hatches open.
Remember the beautiful old redwood I got from the chicken shed that Jen, Kai, Alex and I salvaged last year? I wanted to use these thick 1x12s for flooring in the boat. The also have the advantage of putting some weight down into the hull of the boat.
I had a worry that using straight boards for floorboards, there would be little cracks between them that would constantly filter dust into the bilge and possible squeak when you walked on them. So I had the idea to route the edges to make them lap each other.
Ten boards, eight foot long, two edges each. That's a lot of routing.
Actually, none of the boards were eight foot long, so they had to go in piece by piece.
I used construction adhesive and exterior nails to secure the flooring down. The adhesive will keep the flooring from squeaking and slowly coming up. Modern construction adhesive is so strong, that when you take up plywood that has been adhered down, it comes up in pieces.
It ended up having a neat look.
I wanted to put hatches wherever I could under spaces that were not occupied by fixed objects such as the head, the galley, and the woodstove. After the first three boards aft, I had to start getting strategic with my flooring installation.
It slowly came together. I tried to make the hatch covers match the surrounding boards best I could.
Here's a really bad idea: Using wood that has been nibbled by termites. Some of the wood when I routed it, not only revealed whole termite empires, but actual live buggies.
I went to the lumber yard and drenched everything in Copper Green. This is a special (and more expensive) clear preservative. By clear they actually mean, kind of a deep amber -- but that's preferable to the bright green of the regular stuff.
After all the flooring and the hatches were in, I attacked it with the belt stander, knocking down edges and leaving the different shades a bit more uniform.
I quite like how it came out. I made mismatched hatch handles for each of the four hatches. Can you spot all four?
Here's one of the adorable little hatches open.
Labels:
boat building
,
boatbuilding
,
floor
,
hatches
,
recycled
,
salvage
,
shantyboat
,
termite
,
wood preservative
Obsessive woodworking, top side
With both decks on, I could be an obsessive woodworker again.
First I shimmed up any really large gaps with thin pieces of wood, epoxying them on. Then I routed all the edges.
Once I sanded down the bumps and the previous coat of fiberglass, there were still some larger structural gaps that I wanted to fill with thickened epoxy.
Some of my epoxy kicked off Before Its Time with billows of smoke. Exciting.
I filled the small spaces and the screw holes with latex wood filler. Filling small cracks is more than aesthetic, when the fiberglass goes over the decks, any cracks or spaces will create air pockets behind the fiberglass. That's bad.
Then I sanded everything smooth as butter with an orbital sander. Fancy.
First I shimmed up any really large gaps with thin pieces of wood, epoxying them on. Then I routed all the edges.
Once I sanded down the bumps and the previous coat of fiberglass, there were still some larger structural gaps that I wanted to fill with thickened epoxy.
Some of my epoxy kicked off Before Its Time with billows of smoke. Exciting.
Then I sanded everything smooth as butter with an orbital sander. Fancy.
Labels:
boat building
,
boatbuilding
,
epoxy
,
fiberglass
,
finishing
,
router
,
shantyboat
,
wood filler
Installing the aft deck
I put the aft deck on. Thought you should know.
There were some awkward places in the aft section of the boat where the stringers didn't quite line up. One stringer dipped lower than the rest. So I had to add on little thin wedges of wood to the tops of the members. I am a madman with a circ saw and often do ridiculously fine cuts with this not-so-precise tool. Cut, epoxy, attack with the belt sander.
Voila! You'd never even know. Definitely not once the deck is on.
Putting the actual deck on was a breeze. You only get photos of the finished results, because what used to worry the hell out of me, mixing up epoxy, brushing both sides, mixing up a thicker batch, applying that to the structural members, and then applying stainless steel screws every six inches to the plywood is really no big deal these days. I did it alone and it was done before I even had a chance to take any photos.
Notice the brilliant bow in the center of the deck? That's part of the Glen-L design to allow water to run off.
I know I still have to get under there to bolt in the motor well (and the stern tie-downs), but my excitement got the better of me.
It totally paid off: Hazel and I have already sat on the back deck enjoying lunch and a well-deserved beer in the shade of the willows.
Things organized neatly.
There were some awkward places in the aft section of the boat where the stringers didn't quite line up. One stringer dipped lower than the rest. So I had to add on little thin wedges of wood to the tops of the members. I am a madman with a circ saw and often do ridiculously fine cuts with this not-so-precise tool. Cut, epoxy, attack with the belt sander.
Voila! You'd never even know. Definitely not once the deck is on.
Putting the actual deck on was a breeze. You only get photos of the finished results, because what used to worry the hell out of me, mixing up epoxy, brushing both sides, mixing up a thicker batch, applying that to the structural members, and then applying stainless steel screws every six inches to the plywood is really no big deal these days. I did it alone and it was done before I even had a chance to take any photos.
Notice the brilliant bow in the center of the deck? That's part of the Glen-L design to allow water to run off.
I know I still have to get under there to bolt in the motor well (and the stern tie-downs), but my excitement got the better of me.
It totally paid off: Hazel and I have already sat on the back deck enjoying lunch and a well-deserved beer in the shade of the willows.
Things organized neatly.
Labels:
adhesive
,
boat building
,
boatbuilding
,
deck
,
epoxy
,
shantyboat
Subscribe to:
Posts
(
Atom
)